
Metal to Cloud – Part 13: The Real Payoff
Welcome back!
In Part 12, we deployed the OpenStack Telemetry stack, giving us crucial visibility into our cloud’s operation. We’ve built a robust IaaS platform complete with compute, storage (Ceph), networking (OVN), load balancing (Octavia), DNS (Designate), and monitoring.
Now it’s time to demonstrate the real purpose of all this infrastructure: running applications.
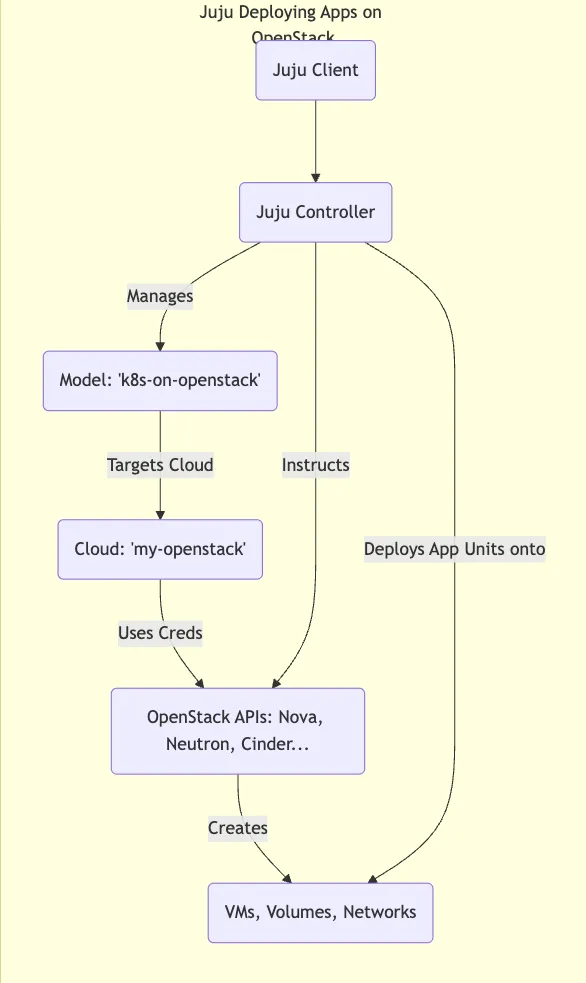
One of the most powerful aspects of the ecosystem we’ve chosen is that Juju, the tool we used to orchestrate OpenStack itself, is equally adept at deploying and managing the applications that run on OpenStack (or any other cloud, for that matter).
Juju Beyond Infrastructure: Application Orchestration 🚀
The same model-driven principles and reusable Charms apply:
-
Define the application components (e.g., web server, database, cache).
-
Define their configuration.
-
Define the relationships between them.
-
Tell Juju to deploy this model onto your target cloud (our OpenStack!).
Juju handles interacting with the cloud APIs (Nova, Cinder, Neutron) to provision the necessary VMs, volumes, and networks, and then deploys and configures the application components using their respective charms.
Targeting Your OpenStack Cloud with Juju ☁️
Before deploying apps, we need to tell our Juju client how to connect to the OpenStack cloud we just built.
-
Add OpenStack as a Juju Cloud: Similar to adding MaaS, we define the cloud endpoint (Keystone URL). Create an
openstack-cloud.yamlfile:# openstack-cloud.yaml clouds: my-openstack: # Choose a name for this cloud in Juju type: openstack auth-types: [userpass] # Use the Keystone VIP from our config.yaml endpoint: [http://10.3.1.203:5000/v3/](http://10.3.1.203:5000/v3/) regions: RegionOne: # Or your OpenStack region name endpoint: [http://10.3.1.203:5000/v3/](http://10.3.1.203:5000/v3/)Add the cloud:
juju add-cloud --client -f openstack-cloud.yaml my-openstack -
Add OpenStack Credentials: Generate credentials for Juju to use. You can use your admin user or, better practice, create a dedicated Juju user/project within OpenStack with appropriate permissions.
# Add credentials interactively (replace placeholders) juju add-credential --client my-openstack # Enter credential name: my-openstack-creds # Select auth-type: userpass # Enter username: <your_openstack_username> # Enter password: <your_openstack_password> # Enter project domain name: Default # Enter user domain name: Default # Enter project name (tenant): <your_openstack_project_name> -
Create & Switch to an Application Model: Create a new Juju model specifically for deploying applications onto OpenStack.
# Use the controller bootstrapped earlier ('maas-controller')
# Target the OpenStack cloud ('my-openstack') and use credentials
juju add-model --cloud=my-openstack --credential=my-openstack-creds k8s-on-openstack
# Switch context to the new model
juju switch maas-controller:k8s-on-openstack
Now, any
juju deploycommands will target our OpenStack cloud.
Example 1: Deploying Charmed Kubernetes on OpenStack ☸️
Let’s deploy a full Kubernetes cluster. Canonical’s Charmed Kubernetes makes this incredibly easy using Juju.
-
Deploy the Bundle: The
charmed-kubernetesbundle includes charms for the Kubernetes control plane, workers, CNI (networking), CSI (storage integration with Cinder/Ceph), and more.# Deploy the bundle from Charmhub (specify a channel/revision for production) juju deploy charmed-kubernetes --channel=1.29/stable --trust # Add --overlay=ovn-overlay.yaml if specific OVN network config is needed # Add --config=k8s-config.yaml for custom settings (node sizes etc)--trust: Allows the bundle to deploy charms that might require privileged operations (common for K8s).
-
Watch Juju Work: Juju will now:
-
Request multiple VMs from OpenStack (via Nova) for the control plane and workers.
-
Request persistent volumes (via Cinder/Ceph) if needed.
-
Configure networking (via Neutron/OVN) for the pods and services.
-
Deploy the Kubernetes components using their charms.
-
Automatically relate components like the CNI plugin, CSI driver, control plane, and workers.
-
-
Monitor Status:
juju status --relationsWatch as the units come up and relations are established. It will take some time!
-
Access Your Cluster: Once deployed, you can get the kubeconfig file:
juju exec -u kubernetes-control-plane/leader -- cat /root/.kube/config > kubeconfig.yaml
export KUBECONFIG=./kubeconfig.yaml
kubectl cluster-info
You now have a fully functional Kubernetes cluster running on your private OpenStack cloud, deployed and managed by Juju!
Example 2: Deploying a Multi-Tier Web App (WordPress) 🌐
Let’s try a simpler, classic example: WordPress backed by MySQL.
-
Create a New Model (Optional but good practice):
juju add-model --cloud=my-openstack --credential=my-openstack-creds wordpress-app juju switch maas-controller:wordpress-app -
Deploy Charms: Deploy WordPress and a MySQL database (using the single-node
mysqlcharm here for simplicity, could also usemysql-innodb-cluster).# Juju asks OpenStack for VMs for these units juju deploy mysql mysql-db juju deploy wordpress wordpress-site -
Integrate: Tell Juju how the services relate.
juju integrate wordpress-site:db mysql-db:db- Juju automatically passes the database connection details (address, user, password) from the
mysql-dbapplication to thewordpress-siteapplication. WordPress configures itself!
- Juju automatically passes the database connection details (address, user, password) from the
-
Expose WordPress: Make the site accessible.
juju expose wordpress-siteCheck
juju status wordpress-siteto find the public address. Juju might automatically associate an OpenStack Floating IP if the charm supports it and Floating IPs are available, or you might need additional steps/charms (likeneutron-gateway) or manual Floating IP association. Alternatively, integrate with Octavia via appropriate charms/relations if you deployed it.
Access the IP address shown in juju status in your browser, and you should see the WordPress setup screen!
Managing Application Lifecycle with Juju 🔄
Juju isn’t just for deployment (“Day 1”). It excels at ongoing (“Day 2”) operations for both infrastructure and applications:
-
Scaling: Need more WordPress frontends or Kubernetes workers? Bash
# Example: Scale WordPress to 3 units juju scale-application wordpress-site --units 3 -
Configuration: Need to change an application setting? Bash
# Example: Change WordPress blog title juju config wordpress-site blog_title="My Juju-Managed Blog" -
Upgrades: Need to upgrade Kubernetes or WordPress?
# Example: Upgrade WordPress charm to a newer channel/revision
juju upgrade-charm wordpress-site --channel latest/stable
Juju handles the underlying steps needed to perform these operations safely across potentially many units.
Conclusion 🏆
This is the real power of the stack! We used Juju not only to stand up a complex OpenStack IaaS platform but also to deploy and manage applications on that platform, ranging from the complex (Kubernetes) to the common (WordPress).
The same model-driven approach, leveraging reusable charms, provides consistency and automation across the entire stack.
We’ve reached the peak of our initial build journey. In the final part, Part 14, we’ll discuss essential Day 2 operations like monitoring in more detail, backups, scaling, upgrades, and wrap up the series.